
MSEQ overview
The malleable 808 sequencer (or MSEQ) is an open source project that brings the joy of live multiplayer improvisation to livesets via the power of the MIDI protocol.
The MSEQ has an array of sequencing capabilities, including 11 polyphonic sequencers, 3 drum sequencers, macro level sequencing of chord progressions, modulation sequencing options for sequencer parameters, MIDI note parameters, and specific control change midi messages. It forms the heart of our improvised livesets, and is the workhorse of our studio and because it is open source - it can power yours too!

The MSEQ is based on 11 8-note polyphonic 16-step sequencers (where each of the 8 rows corresponds to a note, controlling 11 synthesisers), and 3 16-step drum sequencers (where each row corresponds to a drum voice).
The sequencer is divided into these 14 sequencer channels (channels 8 and 16 are used for settings and macro sequencing elements like chord progressions), with each channel accessible using the 16 buttons across the top of the launchpads. Pressing the button will take you to the view where you can see all of the triggers for that channel, and, if it is playing, the position in the sequence will be indicated by an orange bar looping through the steps.
The Launchcontrol has macro controls for duty, velocity, percentage chance probability (the three knobs), volume (on the fader), and per-channel muting/octave control (on the buttons below). The Launch control controls either channels 1-8 from left to right (if in user 1 mode), or 8-16 (if in user 2 mode). Users 3-6 have sends which are routed to FX chains.
On the right hand side of the left hand launchpad are the buttons that control whether or not each of the rows of that sequencer channel are muted or not, allowing for fine-grain control over which notes of a sequence are played or not. Mutes are discussed in more detail below.
Finally, on the right hand side of the right hand launchpad are the buttons that allow for changing between sequencer views for that channel. This allows you to switch from the global trigger view, into a view that allows you to sequence the duty, or the velocity of notes triggered by the triggers, or to change octaves of individual rows, or to step through a modulation sequence of arbitrary length with every new trigger. Each of these views are discussed in further detail below.
All of this, and the MSEQ is multiplayer too (because jamming on your own isn’t as much fun!). Each player has their own view into the sequences being played onto the MSEQ, and can edit or embellish the sequences in real time, or work on different sequences concurrently. This is what we think makes our sequencer special.
Launchcontrol global controls
Before we get into it any further, a note on setup… as described in the hardware setup section, each of the two launchcontrols is paired with two launchpad MkIIs (LP). In this guide we assume when describing the operation of controls that the relevant launchcontrol or launchpad means you are using the device that is supposed to be paired to the device in question.
LC Shift, mute, solo, & record arm buttons
There are 4 buttons on the right of the launch control (LC) that are global, in that they will consistently have the same behaviour independent of which user view you are in. These are used as modifiers for inputting notes, for interacting with the row mute buttons (see below), and for interacting with the buttons on the launchcontrol underneath the faders (see below)
LC Faders
The faders along the bottom of the launch control adjust the volume of that channel.
LC Bottom buttons
The other two buttons on the bottom of the launchcontrol behave differently depending on the mode that you are in on the launchcontrol (and on whether you have any of the other shift, mute, solo or record arm buttons pressed).
In user view 1 and 2 they mute a whole sequencer, whilst in user view 3 and 4 they are mappable MIDI toggles for ableton effects. They can also be used to mute and re-cue a channel in for 8,4, or 1 bar, or 8 or 4 stepss (whichever is longest depending on how many bars are left before it reaches 16).
In user views 1 and 2, if you press shift and one the top/bottom button, it will shift that sequencer’s notes up/down one octave respectively. Likewise, if pressing the mute button and one of the buttons, you can control the octave for the jam keyboards.
Launchcontrol global control reference

Beyond the normal pressing of buttons, the launch control provides you with 4 additional modifier buttons which allow you to quickly access different features without the need for menus. Each of these 4 modifier buttons has a function for features within the Launch control itself and also when inputting notes on the launch pads as shown in the table below:
| LC button | Trig Input | LC top row Button | LC bottom row Button | Row Mute |
|---|---|---|---|---|
| No Modifier | Standard trigger input | Cues channel to mute/unmute at the end of this bar | Cues channel to mute at the next sensible point and re-cues for the end of the 16th bar | Mute/unmutes row immediately |
| Device (Shift) | Percentage chance trigger input | Channel octave up | Channel octave down | - |
| Mute | Inverse mod chance (1-3:4) | Channel Jam keyboard octave up | Channel Jam keyboard octave down | Toggles drone mute status for that row |
| Solo | Tied note trigger input | - | - | Toggles legato mute status for that row |
| Record Arm | Mod chance trigger input | Cues whole sequencer to mute/unmute on next 16 | - | Cues that row to change mute status on next 16 |
| Shift + Mute | - | - | - | Clear that row of all trigs |
| Shift + Solo | - | - | Cue when next appropriate a high-pass filter until the next 16 for that channel | - |
| Record Arm + Shift | Inverse mod chance trigger input | - | Cue when next appropriate Flanger/other FX controlled by CC until the next 16 for that channel | - |
| Record Arm + Mute | - | - | - | Cues a held note on or off on the next 16 |
| Record Arm + Solo | - | - | - | Cues a legato on or off on the next 16 |
In future: Shift + Solo / Shift + Record Arm for row FX and recue, and shift row mute and re-cue will be implemented to allow for more fine grain control.
Launchpad global controls
Sequencer selection
The first 15 buttons in the top horizontal row of circular buttons running across the top of both launchpads corresponds to each of the 15 sequencers available. Button 16 works in the same way, but brings you to some macro level settings pages detailed later.
Pressing a sequencer Select button selects that sequencer, and will update the view to match what has been chosen. Player 1 and player 2 can both select a sequencer independently of each other.
These buttons light up to show the selected sequencer, the step position, and the overall bar count, with a colour scheme for each sequencer, to help with quick identification of which sequencers are selected.
Each one of the sequencers corresponds to a MIDI channel, with the Raspberry PI able to send up to 16 different sets of MIDI signals (we use 14 currently), and player 1 and player 2 can edit these different signals independently of one another.
The sequencers are set up such that 1-7 and 9-12 are traditional polyphonic sequencers designed for synths, whilst sequencers 13-15 are set up for drum tracks. Channels 8 & 16 is not really sequencers at all, but rather a set of global/macro utility views.
View selection
The right hand launchpad of a pair has a vertical row of buttons on the right hand side. These buttons control the selection of views that are available for each sequencer.
NB that because some sequencers are tied in our setup to specific synthesisers, some sequencers will have certain views but others not. In the main, we have tried to keep each synthesiser with a core set of views, and maintain a consistent colour scheme on the view selection buttons, such that it is easy to see which view you are about to access.
See below for a basic set of views for a synthesiser on the left, and then a similar set of synth views with the additional cyan CC arp view on the right.
 |

|
Links to relevant views:
- Duty (Green)
- Velocity (Navy blue)
- Octave Tree (Yellow)
- CC arp View (Cyan)
- Arps (Red)
NB the 3 grey views on the left and 2 grey views on the righ are empty right now - they do nothing when you go into them.
Mutes
The left hand launchpad of a pair has a vertical row of buttons on it’s right hand side. These buttons control the muting of specific rows of the selected sequencer.
The buttons are not lit when a sequencer row is off. An unmuted sequencer row will have an orange light, and a row that has an arp cycling the note that the row is playing will have a magenta light. Both of these will have a matching step positioner light showing what step the sequencer is on.
The mute states are as follows. The states can be accessed using the launchcontrol buttons detailed in the launchcontrol section. The TL;DR is that MUTE will make that row drone, SOLO will make that row play in legato, and REC.ARM will cue the change in mute status for the 1st bar of 16 bars. You can combine MUTE or SOLO with REC.ARM to cue the drone and legato statuses. In this way, you can move between states as and when you like, but with also the freedom to cue a change in state for the future, which is particularly helpful in a live situation.
| Mute Status | Colour | |
|---|---|---|
| 0 | Off | Off |
| 1 | Off Cued On | Grey |
| 2 | Off Cued Drone | Grey flashing green |
| 3 | Off Cued Legato | Grey flashing blue |
| 4 | Drone | Green |
| 5 | Drone Cued Off | Green flashing off |
| 6 | Drone Cued On | Green flashing orange |
| 7 | Drone Cued Legato | Green flashing blue |
| 8 | Legato | Blue |
| 9 | Legato Cued Off | Blue flashing off |
| 10 | Legato Cued On | Blue flashing orange |
| 11 | Legato Cued Drone | Blue flashing green |
| 12 | On | Orange |
| 13 | On Cued Off | Orange flashing off |
| 14 | On Cued Drone | Orange flashing green |
| 15 | On Cued Legato | Orange flashing blue |
Launchpad views
General views
The following views allow for control of macro level features of the sequencer.
Clock division & Chord progression config

In order to ensure the individual sequencers play nicely in concert with eachother, We have included a configuration page that adjusts a number of parameters like clock division allowing you to change many sequencers’ parameters at the same time.
The top three rows show the available clock divisions, with a coloured block denoting the selected clock division for each sequencer. Note that the coloured blocks correspond to the colours for each sequencer from the sequencer selection, where the top bar that counts bars is coloured according to the sequencer you have chosen. From top to bottom the available clock divisions are full speed, half speed, and quarter speed.
The next row down is empty, but the following row is a toggle to decide whether the sequencer can probabilistically drop cut that sequencer for the last 8 bars, 4 bars, 1 bar, 8 steps or 4 steps every 16 bars. If the sequencer is orange in this row, then there is a chance it may get chosen for a drop.
One row down from this is a blue row that dictates how much smoothing is applied to our CC arp sequencers. White means no smoothing (just instantaneous movement of cc values), and darker blue means that the cc values move smoothly over a number of steps (0.5, 1, 2, 4 steps).
Next is a toggle for setting each synth to listen to either of the two separate mod wheels set up on the launch controls. No light means that mod wheel movement does not affect the synth listening to that channel.
The bottom row is a toggle for a trig delay for each synth. If toggled, this will delay the triggers on the relevant synthesiser by a fixed ms amount determined by the global delay knob, to push that sequencer off the grid with a “microtiming” kind of effect.
Key / Scale / Chord Progression selection
The top row has a row of black and white keys with the selected key shown in red. On the right hand side of this we have two buttons which signify major (yellow) / minor (green). This enables you to select whatever key in major or minor that you want to play.
The bottom four rows correspond to the chord progression. The top of these for are coloured according the colours in the sequencer selection for each sequencer. These buttons do nothing, but are there to help aid in picking the correct chord progression option for the relevant sequencer.
The MSEQ has two separate programmable points at which the chord progression progresses, referred to as A and B. In the UI, A is denoted in red, and B is denoted in navy blue. Different sequencers can be told to follow these two chord progression timings independently.
The third row from bottom determines which step A changes on, and which step B changes on. This means you can have a default chord progression (for example, A) changing on the first step, but then another (B) that changes on the 14th step.
The next row allows for you to sequence an order of timings per 16 steps, such that you can have a sequencer progressing using A (on the first step) for the first 3 sets of 16, but then changing to B in the next, etc.
The bottom row assigns a sequencer to either A (red), B (blue), or A-B (purple). In the case that it follows A-B, then the sequencer follows the programmable A/B/A/B/…/A/B/A/B pattern on the row above.
16 bar chord progression sequencer
Those sequencers that are assigned to follow the chord progression, will have notes of their sequence transposed in line with the chord progression. This allows you to imply different chords while still keeping the same rhythm and spirit of the original sequence
For example. If you are having a sequence that plays C E G F on repeat. The 1st, 3rd and 5th degrees of the scale will be transposed, with the 4th remaining stationary.
If the original sequence was therefore transposed to the 5th chord (G) the resulting notes from the sequencer would be G B D F.

The vertical position of the blocks lit up indicate the chord position, and the horizontal scale represents time, divided into bars, such that one block is one bar (in future we may add clock division to this section in order to allow this resolution to change). The colours represent slightly different chord options, as described in the table below:
| LC button | Chord progression sequencer input |
|---|---|
| Device (Shift) | 2nd inversion (-1 octave on the third row) - Yellow |
| Mute | 3rd inversion (-1 octave on the 5th row) - Red |
| Solo | Random choice (-1 octave on one random row, but not top or bottom row) - Blue |
| Record Arm | Random Chance (randomly choose between the three above states) - Green |
Chord progression editor
Edits which degrees of the scale are affected by the chord progression, per sequencer (yellow means that row is affected, no light means that row is not affected), with a column per sequencer, so that different sequencers can be affected differently.

Chord Progression Octave Tree
Octave Trees are explained here, and they allow for adjustment of octaves by row. This octave tree allows for octave adjustment of each chord being played, and also of sequencing that octave modification over time as well.
Swing View
In swing view you can set a coarse amount of swing for each sequencer using the launchpad, and then adjust it with the rightmost, topmost knob (the first knob on column 8) of each launchcontrol.
The launchpad shows the coarse amount of swing, with the 5th row being the default - 50% swing when fine control is untouched. As you turn the knob, it adds positive swing. To get negative swing, move the coarse setting down one for that sequencer, again moving the knob to find a groove that matches what you are looking for.

Lights Off View
Press the button on the top left to turn all of the lights off. Change sequencers using the top buttons to turn it back on.
Synth Views
These views are the standard views that allow control of individual synthesizers, predominantly note input, but also controlling duty and velocity of the synths listening to each midi channel.
Note trigger input
When you select a sequencer, you will enter the note-input view by default. This view allows you to input notes by step. Using the modifier buttons on the launch control allows you to add trigs to each row.
There are various types of trigs which can hit conditionally (mod chance or % chance), or tied trigs, (that can tie a note together over multiple steps), which allow you to add additional rhythmic variation to your pattern.
| Launchcontrol button | Trigger type | Description | Colour |
|---|---|---|---|
| None | ON/OFF | Standard trigger | A rather fecthing Turquoise |
| SHIFT | PERCENTAGE CHANCE | Trigger hits a % of the time determined by the bottom knob for that sequencer on the relevant launchcontrol | Green |
| MUTE | MUTED | Muted trigger - like off, but you can still see that a trigger is there, useful for pairing back a busy pattern that you might want to reprise later on. | Bone |
| SOLO | TIED NOTE | A trig that holds for as long as you select | Yellow with a white trail showing the sustain |
| REC.ARM | MOD CHANCE | A trig that hits on the xth time every y times (x:y) - either 1:2, 2:2, 4:4, 8:8, 16:16 | Pink, lilac, then three shades of darkening blue |
| SHIFT + REC.ARM | MOD CHANCE | A trig that hits all the time except on the xth time every y times (x:y) - either 1-3:4, 1-7:8, 1-15:16 | Orange, deep orange, Red |
Note Trigger example
As an example, here is an example of how triggers are added to the note trigger view, Assuming we are in C minor see key/scale/chord progression view for details. First we start with a standard note trigger (will hit every time) on the 1st, 5th.9th and 13th step, playing G. Then we have percentage chance triggers on steps 1,4,7,10,13,15 for note B♭.

Next we mute all bar the first of the percentage chance triggers, so that they remain lit up, but are disabled.

Then, we add some tied notes on note E♭, which are shown to sustain for the number of steps of the whole yellow and white section (they are still affected by the duty set for that sequencer, but let’s assume for now duty is set to 100%). So the first trigger starts on step 1 and holds until step 5, then again from 9-11 and from 13-15.

Next, we add some 1:2 mod chance on D (steps 1 and 7), and some 2:1 mod chance on C (steps 4 and 10). So we play D on steps 1 and 7 on the first bar, but C on steps 2 and 4 of the second bar.

Adding more mod chance on C - the blue steps shown on step 12, 14, and 16 are triggered on 4:4 (every fourth bar), 8:8 (every eighth bar), and 16:16 (every 16th bar) respectively.

Swapping mod chance for inverse mod chance on C means that steps 12, 14, and 16 now trigger every time, except the fourth, eighth or sixteenth bars respectively. Notice the colour has changed from light blue -> blue -> dark blue, to orange -> deep orange -> red.

16 step duty sequencer
So far you have seen that in the default note trigger view, different notes can be triggered on different steps, but we also allow for sequencing of duty to determine variation in note length. The first of the selectable views on the right hand of the launchpad allows you to change the duty of each step. Each step has a duty length as determined by the green/yellow light per step.
The total duty time is dictated by a combination of the global duty knob for that sequencer (as determined on the launch control) and then factored by the step duty amount. This allows you to keep the relative duty of each step when adjusting for shorter or longer notes with the launch control duty knob.

16 step velocity sequencer
The second selectable view is the Duty view which controls the velocity of each step. This is identified by the blue/red light per step
This view interacts with the global velocity knob for this sequencer in the same way as the duty knob in duty view. Allowing you to keep the relative velocity between steps when increasing or decreasing global velocity. This means that you can have a nuanced, accented pattern, and play this at different velocities.

Octave tree
Although shift-pressing the bottom launchcontrol buttons allows for wholesale control over the octave for any given sequencer, sometimes you will want a spread of notes beyond the single octave that you are working in.
In this case - this view is your friend. The left hand launchpad allows you to set an octave modifier for each row. The yellow row in the middle is unmodified rows, whilst pushing buttons to the right of this will increase the octave (showing green for each additional +ve octave modifier). The same can be done to push a row to a lower octave, by pushing to the left of the yellow column, showing a red-lit button for each additional -ve octave modifier).
The images below show the octave tree initially with all rows set to the default octave, but then again with the bottom rows on -3 octaves, increasing one octave per row until the top row is +3 octaves (it can go up to +4, and down to -3).
In this way, a pattern on a sequencer can be partially shifted up and down octaves reasonably quickly and easily to give more interesting options!

Then, on the right hand launchpad, we have a “meta-sequencer”, which will push up or down the row it is on by a number of octaves, with each button representing four steps, such that the first square is steps 1-4, then 5-8, then 9-12, then 13-16, and then it loops back round into a second bar, repeating the pattern. Green squares indicate positive 4-step octave modifiers, and red squares indicate negative 4-step octave modifiers.
As such we can see that the bottom row is shifted up one octave for the first four 4steps of every bar, and this combines with the octave tree setting on the left, so that normally the synth is playing -3 octaves, but for steps 1-4 it plays at -2 octaves. It is possible (although the picture doesn’t show this) for any 4 step octave modifier to take any value, so that you can be constantly shifting, or shifting in an A/B style pattern over 2 bars.
Note selection / Arp control
A note here: this view started off as arps, because if you play a pattern with a trigger on every step, and engage this trick, you get an arpegiation effect. But really, it is a stepped modulation sequencer, where each time the sequencer triggers a note for that synth or drum voice, it steps through the sequence so that the next note will be triggered with the next value in the sequence.
Even with the octave trees, having 8 fixed notes can make the pattern feel a bit stale, even with the conditional note triggers. Octave trees allow you to manually shift a row up or down an octave, The arp control view allows you to automatically shift notes up or down to any given note (within a four octave range).
When the sequencer triggers a note, it looks in the list of notes specified for that row. By default the list of notes for each row contains one note, chosen such that the 8 notes form a C minor scale.
This view allows us to extend this list for each row to include up to 8 notes in any order, including rests. Every subsequent trigger for that row will move along this list, playing each note in turn.
This has the effect of an arpeggiator when you have a note on every step for the row you apply the arp to. But it also has interesting uses where you have a more sparse pattern. For example, a pattern with four trigs playing the same note can be changed into something that is constantly evolving by setting a three step length arp that changes the note on each time a trig triggers.
Setting arp length
The Arp view is split into two. On the left hand side is the control for setting the length of the list of notes to be played (arp length). By default there is a red line on the leftmost column of the left hand launchpad (i.e one note that is always the same for that row), and as you extend the length, a rainbow pattern appears, allowing for a length from 1-8 notes long.
To extend the length of an arp, press and hold SHIFT on the launchcontrol, then select for that row a number of notes from the left that you want the triggers for that row to loop over when they are triggered.
Editing the notes inside the arp
On the right hand side, there is an isomorphic keyboard that allows you to select the notes for each one of the rainbow coloured lights showing on the lists on the left.
Press the note on the left hand launchpad that you want to edit, and the right hand launchpad will refresh with the currently selected notes in that arp for that row on the isomorphic keyboard. Then you can choose a new value for that note. You can repeat this for any and all of the notes in the arp. To add a rest, there is a bone coloured square in the top right of the isomorphic keyboard.
There are a range of defaults that allow for thirds/fourths/fifths…etc, which go up, down and up/down, and double versions of these (where the notes are repeated twice at each stage in the arp). These can be accessed by holding the SHIFT / MUTE / SOLO buttons and pressing different columns on the left hand Launchpad, as below.
Here we can see an arp that goes upwards over three notes.

And here is the same arp set to downwards over three notes.

We call this view arps, but it isn’t really. It’s more of a way of cycling through notes. By way of explaining the above images, lets imagine that we have a single trigger for that row, on the first step. So on the begining of every bar, the sequencer plays first the red note, then the orange note, then the yellow note, then the red note again. In the top image, red is the bottom, and we progress upwards, and on the bottom image, red is the top and we progress downwards. So far, so dull. But even in this case, if you had two other notes on the first step, then you can get to a chord which changes each time.
Instead then consider a two trigger pattern on the top row, and now we have a pattern that plays red-orange, yellow-red, orange-yellow, red-orange, etc. You could set the top row to play legato (see the mutes section for more detail), and have that looping pattern sustained, and use that as a basis to build the pattern around.
It is also important to note that the sequencer only progresses along the list of notes when a trigger plays a note. So combining arps with the conditional triggers (mod chance, where the note is triggered or not every X out of Y times, or percentage chance, where the trigger makes a note according to random chance), vastly expands the potential for complex patterns. The use of rests inside the arps too can acheive this - where the note only plays when the trigger hits, and where the note selected is not a rest!
Arp Presets
We have built in a number of preset arps, this section details how to access them, by pressing one button on the launch control, and then selecting a column on the left hand launchpad - the interval of arp presets is selected by picking the 3rd column from the left for 3rds, the 4th column (for fourths), etc.
When these buttons are pressed in combination, arps are loaded into every row for that sequencer (arp lengths are left untouched, so this change in notes can be done live, changing the flavour, but without destroying what you are doing). The type of arp preset is accessed through the following button combinations.
| LC button | Arp preset |
|---|---|
| Mute | UP |
| Solo | DOWN |
| Record Arm | UP/DOWN |
| Shift + Mute | DOUBLE UP |
| Shift + Solo | DOUBLE DOWN |
| Record Arm + Shift | DOUBLE UP/DOWN |
CC arp control
Another way to add variation to a pattern that is a bit limited or static sounding, is by twiddling the knobs on the front of the synths. Whilst we at malleable love this as much as the next person, sometimes you just don’t have enough hands. Luckily, MIDI can make up for this - so to address this problem we have added some CC sequencing capabilities that you can use to address the CC-responsive parameters of your synths.
Generally, we use the following colour scheme to denote the type of knob we are targetting for modulation with the CC arps:
| CC colour | CC type |
|---|---|
| Green | Filters (cutoff/resonance) |
| Blue | Waveform Modifiers |
| White | Waveform Mix |
| Pink | FX |
| Orange | Pitch/Tuning |
| Beige | Decay |
| Yellow | Misc |
A CC arp operates in a very similar way to the note selection / arp control view. On the left is the length of the arp. With CC arps the possible length is 0-7. When the length is zero that means no CC values are being sent, so that you can control the relevant knob with your hand rather than fighting with the invisible MIDI hand that is also tweaking that parameter, and when the full row is selected, that means that it will progress through 7 values for the CC message, in line with each time that the trigger is triggered.
The difference is on the right hand side - instead of an isomorphic keyboard, here there is a 7 step sequencer whose values can be programmed by drawing the pattern onto the right hand Launchpad. The length of the CC arp sequence is determined by pressing the relevant button on the relevant row on the left hand side.
Jam keyboard
For playing notes, direct from your fingers, into MIDI notes, but in an isomorphic keyboard layout, a bit like what you’ve seen on the ableton push, and in the arp editing view outlined above. You will find this to the right of the octave tree.
Direct monitoring jam keyboard
As above, but when you have a big chunk of latency between your fingers hitting the keyboard and the sound hitting your eardrums, it’s difficult to play in time.
This is an experimental view that tries to solve this problem. It allows you to write in a pattern of gates in the top row, then hold the keys on the jam keyboard to play it. There are known issues with this feature. Fixing it is on the roadmap.
Drum machine views
In order to facilitate the most nuanced controls for drum machines we had to rethink the sequencer we had built for synths below outlines the different drum machine views.
TR-8 sequencer
We have a TR-8 as our workhorse drum machine, alongside an elektron (whose sequener is a masterpiece and a large inspiration behind this sequencer). The TR-8’s internal drum sequencer leaves quite a bit of the functionality of the machine out - (“wot - no velocity, Roland?”). So we built this drum sequencer to make the most of its capabilities.
TR-8 Note Trigger input
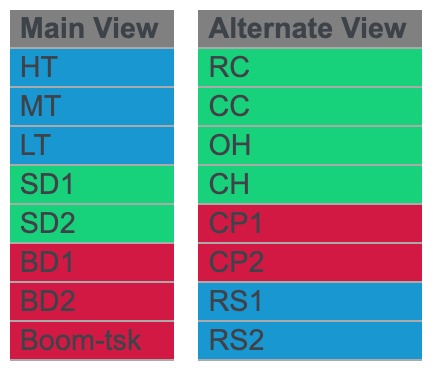
This default view is the equivalent view to the note-input view for the synthesisers,only it covers 16 notes, rather than 8. By using the up/down buttons on the launch control you can toggle between a view for kick, snare, & toms (the main view) or a view that covers the rimshot, claps, hi hats and cymbals (the alternate view).
 |
 |
To avoid confusion each drum sound has a different colour mute light as shown in the table & images below and there is a status light on the 5th channel of the relevant launch control which lights orange when in the alternate hats/cymbal view (see above images).
You will see that there are two rows for the kick and snare, clap and rimshot. The clap and rimshot send two different midi notes enabling you to play all of the sounds of the TR-8 (assuming you pick the correct instrument). All of thse rows have two separate velocity inputs (see more in the next section), enabling you to add in ghost notes (by default the second row is set to a lower velocity than the first).
 Another distinction is the prefilled 4-4 kick and offbeat closed hat row that is present on the bottom row of the main view. On unmuting this row, all other TR-8 rows that are playing will be muted, bringing the drums back to something square.

TR-8 velocity arps
16 step velocity sequencers are good, but we found them a bit too precise for adding interest to drum patterns quickly. The TR-8 view has instead got a series of velocity arps that work in a very similar way to the note arps and CC arps.
TR-8 CC arps
The TR-8 has an abundance of CC addressable parameters. The CC arps in this view mostly affect the decay of each of the voices. These are mostly aimed at Tuning and decay, and follow the same colour scheme as for other sequencers detailed in the CC arps section.
TR-8 Accent sequencer
This is a 16 step sequencer that applies a global velocity scaling to all of the TR-8 voices to add a groove across a beat independently of the per-voice velocity modulation.
The UI is shown below, with a 16 step sequencer that sets the level of the FX at each step (the bottom row is OFF), so here we have a pattern with two steps on in steps 3 & 4, then off until the last 8 steps where the FX level increases over the 8 steps.

Volca drum customised views
We also have a volca drum, which is also an incredibly powerful piece of kit, hamstrung by the tiny and fiddly onboard sequencer. The volca drum needed a different set of requirements to the TR-8, and so there are some small changes that should be noted here.
Most notably, we have included two tuned voice views to make use of the ability to control the volca drum’s pitch via CC, allowing you to play it more expressively, even using it more as a synthesiser than a drum machine.
Volca Drum Note trigger input
The first 4 voices on the volca drum are not being sent cc messages to control their pitch, allowing these voices to be used for more traditional “drum” sounds. This view functions in much the same way as the TR8 note input view.
Tuned drum notes views
There are two separate views which allow voices 5 and 6 to be used as two monophonic synthesisers. The notes are pitched to the minor scale in the same way as the other synth note input views and behave the same way, allowing for mod chance & %chance etc.
CC arp
The volca drum responds to CCs. This view allows you to send sequences of CC values to the synthesiser and works in the same way as CC views elsewhere. Each row changes different CC value:
- list of
- CC values
- & their functions
The alternative rows affect velocity, and work like the Velocity arps on the TR-8 sequencer.
Volca Drum Octave tree
The volca drum tuned sequencers both have an octave tree, and you can edit them both at the same time here. Voice 5 is on the left and voice six is on the right.
Velocity sequencer
Exactly the same thing as the velocity sequencers for the synth views. There are two of these views, one each for the tuned volca drum sequencers.
Launchcontrol views
Standard views
In view 1 and view 2, for each of the 14 sequencers, there are three knobs which control the following (from top to bottom):
- Duty
- Velocity
- % chance (what chance a % conditional trig will hit for the relevant sequencer)
Ableton control views
This view controls the effects being added in ableton to the hardware synths you are controlling.
The knobs control the following elements which are set up in ableton (from top to bottom):
- Reverb send
- Delay send
- Dials in a 4/4 sidechain effect. At 0 the effect is off, dialling up to extreme side chain when the knob is turned to full